Verse of the Day {KJV}

Showing posts with label photos. Show all posts

Thursday, January 29, 2015

Winter Wonderland!

How to enjoy a walk in the cold...
Break ice when discovered.

The sun was shining very brightly.


And some wildlife


And we saw quite a few of these flying things *wink*


Just two more-

Tried to catch him in mid-air. I'm too slow.

Thursday, January 8, 2015

Gluten Free Cornbread

I've searched and searched for a gluten-free THM E cornbread recipe {that I was completely happy with} to no avail. They just do not meet the need I have to be gluten-free and "E". I decided to take one that was good for THM E and make it gluten free. 

The one I went with and tweaked can be found at Mrs. Criddle's Kitchen, and if not for the wheat flour, I might have tried to do that one. 

Gluten-Free Cornbread {THM E}
Ingredients:
1 cup cornmeal
1/3 cup oat fiber
3/8 cup oat flour
1/2 tsp salt
1 1/2 tsp baking powder
1/2 tsp baking soda
1 cup 0% Greek yogurt
3/4 cup + 3 TBS carton egg whites
6 TBS water

Directions: 
Preheat oven to 425*F. Line a square baking pan {8x8 or 9x9} with parchment paper and lightly spray with nonstick spray. You can cut a square of parchment to fit the bottom of the pan, then use scraps to line the sides. 
In a medium bowl mix all dry ingredients. 
In a separate bowl mix all wet ingredients. Add to dry ingredients and mix well. You don't want clumps. {Well, I don't.}
After all is combined, pour into prepared pan and bake for about 30 minutes. 
Let rest a few minutes after baking. Cut into 9 pieces.

Notes: It is best to use sprouted blue corn for the cornmeal, but this is technically still an "E". 
If, no scratch that- when I make this again, I will up the oat fiber and decrease the oat flour. The latter gave it a bit of a gummy texture. I make my oat flour by grinding it up in my coffee grinder. Easy peasy.
The original recipe called for Sweet Blend. I've always liked cornbread with honey and I didn't want to change that memory. I just left out any sweet this time. And I think I need more salt next time.

Everyone {but the Warden perhaps} liked the cornbread. It was nice and moist and had {almost} the right texture. We had it with chili, for a nice cold weather dinner.


Thursday, October 16, 2014

Gluten Free Adventures- A Continuous Post

I'll add to this post occasionally. 

10/16/14: "Oatmeal" cookies
The original recipe is here.

Here is what I did:
1 cup almond meal
1/2 cup coconut flour
1/4 cup old fashioned rolled oats
1/8 (ish) cup shredded unsweetened coconut
1/2 cup coconut oil, melted
2 TBS flax meal (ground whole flax in the coffee grinder) + 6 TBS water
scant 1/2 cup "sweet blend" (erythritol and stevia- a mix of different brands)
1 1/2 tsp cinnamon
1 1/2 tsp vanilla
1/4 tsp salt
1/2 tsp baking soda
2 TBS unsweetened applesauce

Directions: Preheat oven to 350*F. Line cookie sheet with non-stick material. Mix flax meal and water; set aside until gelled. In a large bowl combine all other dry ingredients. Combine oil, applesauce, and vanilla to the flax gel. Add to dry ingredients and mix until combine. 

Drop by spoonfuls onto lined cookie sheet. Bake for 15 minutes or so. {I baked about 20.}

Result: I baked half of the dough to start with because they are small cookies. Due to the coconut flour (I'm sure) they were drier than I think the original recipe. I added about 1/2 cup unsweetened almond milk to the remaining batter, and refrigerated it until the first batch were done baking. 
I flattened the cookies because they don't rise or 'melt'. They cook the way they drop on the sheet. I wanted to make oatmeal sandwich cookies. 
Why didn't I just use the recipe I have down the page here? Because I wanted something more 'on-plan' with THM. These cookies here would be an S or perhaps S-helper {bordering on crossover, maybe}. Whereas the others are not on plan because of the flours I used. 
Taste is yummy; texture is not so good. Crumbles way too easily.
Edited: After they'd cooled much, they stay together better.


Cream is just heavy whipping cream with stevia/erythritol blend and vanilla.
Edited: I put these in the freezer and yum. They are like ice cream cookies :)

04/30/14: Gluten free, yeast free, milk free oat bread

Long title for a bread. Easier to call it ...bread... Anyway. Here's the link to the original recipe- which I followed mostly.
Here's my tweaks:

3/4 cup oat flour {this is simply oats ground up in my coffee grinder}
1 cup sweet sorghum flour
1/4 cup sweet white rice flour
1/4 cup cornstarch
2 tsp baking powder
1 tsp baking soda
2 TBS chia seeds
6 egg whites
1 TBS ACV

1 TBS honey

I also put the 1/4 cup oats on top. I couldn't figure out why it took so long to cook compared to the instructions on the original recipe. Silly me; I didn't copy the oat flour amount correctly. I only put in 1/2 what was called for! I used the sweet white rice four and cornstarch because I don't have tapioca starch. And I used egg whites because I have egg white powder and not so many whole eggs. I tend to improvise. A lot.

Result: I love the first loaf of this bread. Really. I made it on Sunday or Monday. Texture is really good and if I'd used what was called for with the oat flour it could have been even better! Taste was good. It went well with butter and made a yummy peanut butter sandwich. I didn't try it any other way but I'd think it would be good for a meat sandwich, too. 


I am making it again today. I tweaked the recipe again. I cut the sweet white rice flour and cornstarch in half and added 1 tsp gluccomannan. I also used only 1 TBS chia seeds and added 1 TBS flax seeds. I used the coffee grinder to make meal out of 1/2 TBS of each, so there would be a little crunch in the loaf. And finally I omitted the honey and subbed erythritol instead. {And for some reason I still forgot to make sure I put the right amount of oat flour.}


********************************

04/11/14: Gluten free pizza using Bob's Red Mill GF Pizza Crust mix

I followed the instructions for the most part but instead of 2-12 inch pizzas I made 4-6 inch pizzas. I cooked them for a total of 20 minutes, with no toppings. I let them cool completely on a rack and then wrapped three for the freezer and one for the fridge for tonight. 

I topped it with homemade pizza sauce, goat cheese {definitely not a favorite but it'll work} and pepperoni. 

Results: The taste is fine; the texture is a bit tougher than regular pizza but okay. The only problem I had is that my heart rate accelerated after eating and I'm waiting for it to go back to normal. That's a biggie for me. Not sure why that happened. I only bought one package so I think I will see how it goes next Friday to see if it repeats. {Edited: I've not had it again yet. 04/30/14}


******************************

03/30/14 (?): Gluten Free Oatmeal Cookies

1 1/4 cup gf flour
1 3/4 cup old fashioned oats
cinnamon, cloves
1 tsp baking powder
1/4 tsp baking soda
1 TBS molasses
1/2 cup erythritol
1 egg + 1/3 cup egg white 
1/2 cup almond milk
1/2 cup coconut oil


Preheat oven to 375*F. Line a cookie sheet with parchment paper. If you use aluminum foil, grease it first.
Mix coconut oil {I melted mine in the microwave}, erythritol, and molasses well. 
Add egg and egg white. Mix. 
Add 1/4 cup almond milk. Mix. 
Add cinnamon, cloves, baking powder and baking soda. Mix well. 
Add in flour gradually, stirring until combined. If it's too dry, add the rest of the almond milk. 
Stir in oats. 
Drop by spoonfuls onto lined cookie sheet. Press into cookie shape as these do not spread as the cook. Makes about 3 dozen.
Cook for 10-12 minutes. Cool for a minute or so on the tray, then transfer to rack to cool completely. 

Result: Super yummy! I ate way too many. I put the leftovers in ziplock baggies in the fridge. After they get cold they are a little crumblier than fresh; still good!


*******************************

3/21/14: Tonight I want to try to make a gf pizza crust and then use cottage cheese for the cheese. I can tolerate cottage cheese but not regular cheese {go figure}. I really want pizza!

I will use the same gf flour I used in the drop biscuits that turned out so yummy. {Really, I am so making those again!} The crust recipe I normally use is as follows:

2.5 cups all-purpose flour
1 tsp salt
2 TBS oil
1 TBS yeast
1 tsp sugar
1 cup warm water

Directions: I use hot tap water in my pyrex liquid measuring cup and add the tsp sugar to the water. Next sprinkle the yeast on top. It usually falls into the water and starts to eat the sugar, and within 5 minutes there are bubbles. 

Put all other ingredients in a food processor with the dough blade. When yeast mixture is frothy- it's usually very frothy at just under 10 minutes- add to the flour mix. Pulse processor to get it going, then blend until a ball forms and doesn't stick to the sides. It doesn't take long at all. 

Dump dough unto a lightly floured board. Knead just a few times and then press into a pizza crust shape. Make it the size you want, or split the dough to make individual pizzas. That is usually what I do. 

To make the pizzas, put on a pizza stone or cookie sheet and add toppings. Bake at 450*F for 10-12 minutes. 

For my purpose, I only need 1/2 the recipe. I'll post again later with the result.

Results: Taste was great. The texture was 'wrong'. And I didn't follow the original recipe as written because I've read that it takes more gf flour than regular flour; also, it needed more water. Unfortunately, I added too much water at first. Next time {yep, it was good enough to make again *smile*} I will let the dough attempt to rise before baking; something I don't have to do with regular flour.


*****************************

3/17/14: I posted my 'drop' biscuits using the diy gf flour I made but I really need something that is a little more THM friendly. Next up is an attempt at Gwen's Easy Bread, but gf with what I have. Having made the Easy Bread before, I know it tastes good {at least I like it}. Here's to a yummy gf easy sourdough bread.

And... it isn't as I'd hoped. Here is the recipe I used {but I cut it down to half a batch}:

2 cups buckwheat flour
1 cup Millet flour
1 cup Brown Rice flour
1 cup Garbanzo bean flour
1 TBS + 1 tsp Glucomannan Powder
2 TBS Instant Rise Yeast
1 TBS salt 


Mix it together. Add:


3 cups warm water

2 TBS Apple Cider Vinegar

I mixed it and then let it rise. Then put it in the fridge as per Gwen's recipe. I took it out today and let it 'rise' {it did not} for 20 minutes. Preheated the oven and let it 'rise' 20 minutes more {it still did not}. Then baked for the time called for. It 'rose' about a half inch. Maybe. Photo below.


One thing I am sure of when it comes to gf flours: I do not like garbanzo bean flour. Love garbanzo beans themselves, cooked, canned, etc. Not the flour. Blech!

Result: Nasty. In the trash it went. It was a bit like vomit tasting. LOL. Just being honest here.

Saturday, June 14, 2014

We went to the Charlotte Mason Institute 2014 Education Conference

This is just one quick post from when we were at the CMI 2014 Education Conference held in Boiling Springs, North Carolina. 

We were not able to go to the pre-conference sessions and we had to leave early. I'd say the worst part was the long drive there and back. We were not able to attend all the sessions we wanted to. We should have gone to the upper years sessions more than we did. Fortunately, the CMI website will have recordings {and I believe text; don't quote me!} of the different sessions. 


The campus of Gardner-Webb University is absolutely beautiful. Lee was captivated by it so much that she briefly considered attending. 


I had wanted to get photos of/with my CM friends but I totally spaced it. I did not take very many photos at all. Other than the ones here, I only have a few more. 

I would share more of the great material presented at the conference but I am so tired still. I've not slept well since Monday night! Posts about the sessions we did get to will be forthcoming. 

Here is a video about the Northern Mockingbird, which we saw and heard, and were mesmerized by his territorial 'dance'. 


Friday, May 9, 2014

Our Etsy Latest


The kids' and my shop is officially open, with just a few things for inventory. We are working on adding more. {Or rather I should say I am...} The shop used to be called "Lossolleff Co" but we've changed it to "Mi Lossolleff". 

And if you happen over to Etsy, stop at my mom's shop: LinderCroft

What kinds of things do you look to buy at Etsy?

Friday, May 2, 2014

Taking Inventory and Stocking Up

Hearts for Home Blog Hop
This post is linked-up with Hearts for Home Blog Hop

There have been some points within the last 5 or so years that we have gone out of our way to make an effort to stockpile nonperishable items. We have done it twice since living where we do now. But that's all gone. It was so nice to have that reserve downstairs to fall back on. 

This month I have begun to stock up again. The shelves in the photo below were empty but for the big bag of rice on the bottom shelf.
What isn't in the photo: two bags of white flour, three bags of brown rice flour, 3 bags of buckwheat flour, 1 bag of white rye flour, 1 bag of dark rye flour, four bags of brown rice, a 50 lb bag of rolled oats, and a jug of laundry soap. All but the soap is in the freezer right now. I always freeze my flours, rice and oats for a long time before using it.

Things I still plan on adding include canned vegetables, bottled water and juices. Actually more of all of what is there. And more peanut butter. Definitely. Right now it seems that the majority of the items are tomato based, so I'll need to balance that out. 

I, once upon a time, had an inventory sheet that could be reproduced. I've since lost it and I was too unimaginative to make my own so I went to Pinterest to find one that was simple. For some reason I only downloaded the files and did not pin them so I can't link to any but the original board I started at. 

The one I decided to use, first because it had the least amount of color and second because of its wonderful simplicity, comes from Organized Home {Pantry Inventory}. It's hanging up in the photo. Eventually I will print off the Freezer Inventory one and work on that as well. We have some meat in the freezer right now but that's about it. 

One thing that needs to be considered when stocking up is the end purpose. I don't think I need to stock up for an end of the world scenario. Honestly, other than to have the extras so I wouldn't have to go to the store to get it {because I simply don't wish to drive there or because we don't have the money to buy the item, let alone the gas to drive!}, I haven't really thought of the long-term benefit of a pantry. I definitely should have. There have been times when I had to go without food at a meal so that the kids could get enough. I really don't think there's any need for that {granted it has been quite a few years since that, but still...}.

My husband thinks about it more than I do. He occasionally mentions that we need to get our pantry filled back up. When he was growing up his mom grew just about all their food, preserved it and stock piled {and he and his siblings helped I'm sure}. He is very conscious also about rotating the stock. We have only had to do that once in our pantry stocking experience since we've been married. It usually gets emptied long before anything gets too close to the expiration date. 

But this time we are going to fill it better and keep it longer. The way I started this time was to look at sales in the area and take advantage of those. With the exception of a few things, all of the items in the pantry were on sale. I will do that every so often and soon our pantry will be quite full, I'm sure. 

Do you stock up? 
What's your favorite method? 
What are some must include items that you would recommend?

Tuesday, April 8, 2014

Greenhouse Photos


Garden! In a Greenhouse

This post contains affiliate links*. See Disclosure/Policies

Look what's in our backyard...


A greenhouse*! And it's not going anywhere either. We anchored that thing down good. Hopefully somewhat soon I may be able to share the construction, in stills or maybe a quick video, but for now, here's a photo of the finished greenhouse.

I was able to put the rotating composter* in the greenhouse but I may have to rearrange it as I want to have buckets and totes for plants in the back where it is now. 

We dug two trenches that we then put two boards into and back-filled. These were secured by anchors into the ground. The frame of the greenhouse was very easy to put together. We did it as a family on Sunday afternoon. The only day so far that was nice enough to do outside work. {Although as I typed that, the sun has come out, the rain has stopped and the clouds are far off.}

You can see the board a little closer here {I hope}.

There are shelves inside for the smaller plants and starts. Now I just have to get going on the seedlings! We bought some zucchini, spaghetti squash and kale seeds yesterday, along with some garden soil. I have paper egg carton bottoms for starting them. 

I'm still so excited when I look out the classroom window and see our greenhouse out there! 

Saturday, March 15, 2014

Gluten Free Drop Biscuits

Yay! I got my order of gf flours yesterday...and then the power went out. Go figure. Today I have made three batches of all-purpose flour to try out. Here are drop biscuits I made from "Experiment #1".

Flour ingredients: 
1/2 cup sorghum flour
1/2 cup brown rice flour
1/8 cup millet flour
1/8 cup buckwheat flour
1/8 cup quinoa flour
1/8 cup sweet white rice flour
1/2 TBS + 1/2 tsp glucomannan powder

Biscuit recipe:
1 3/4 cup flour above
1 TBS baking powder
1 tsp salt
6 TBS cold butter, cubed
1 cup almond milk -plus enough water to make a 'drop' biscuit dough consistency

Directions:
Preheat oven to 450*F. 
Mix flour well beforehand; add baking powder and salt. Mix. Cut in butter until resemble coarse crumbs. Add almond milk and water until desired 'drop' consistency is reached.
Grease cookie sheet. Drop spoonfuls of dough onto cookie sheet. Bake for about 17 minutes, until golden brown on top. Makes 15-18 biscuits. 


I chose to use almond milk so that I could eat these {butter, occasional cottage cheese and smidgen of greek yogurt is all I can seem to tolerate}. After all I am the only one that is choosing to be gf in the house. I would have used all almond milk but I ran out before I'd reached the right consistency. Water worked just fine. 

These were very yummy. I am so surprised, honestly. This is the second or third time that I have tried to make gf biscuits that I didn't end up throwing away. Nutritionally, I'm not sure these are wonderful but I can definitely see myself eating these occasionally. 

http://caloriecount.about.com/cc/recipe_analysis.php 
I would like to experiment some more to lower the fat and raise the protein. And I might increase the baking powder, or use a combination of soda and powder. But really these were yummy. The kids even liked them *wink*.

Saturday, March 8, 2014

Friday and Saturday Projects

In my weekly wrap-up post I mentioned on Friday we ran an errand that included buying another bookcase. This one is different than any of the others that we have. We usually get the three shelves in a wood color. To shake things up a bit, we went with an 'organizer bookcase' this time; in black. Okay, fine. They didn't have what we usually get *wink*. I'm very glad though that we chose this one! 
Lee {proudly} put it together all by herself, and with her own tools.
Its purpose is for library books, review books, and currently reading books and notebooks {well, mine anyway}. I'm really happy with it.
A little closer view.
It's also for nature items we find.
An empty jar of ginger beer {from Australia} and a very old penny. Not really 'nature'...
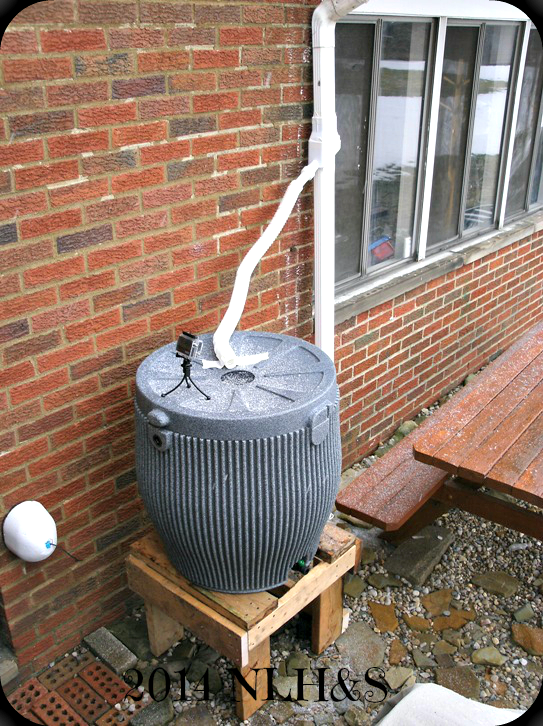
And then today, Saturday, the Warden and I {mostly him though} worked on making a stand for the rain barrel I won at a Wild Game Dinner raffle drawing March 1st. I've wanted a rain barrel for quite awhile and even considered trying to make one. The downspout had to be diverted also so that took some engineering {again, he did that}. Here's the finished product.

And I think that is about the extent of our 'projects' this weekend. The weather turned cold! It's now a good time to grab a warm cuppa tea and snuggle with a good book. 
Related Posts with Thumbnails

social network stuff

PhotobucketPhotobucket Photobucket Photobucket Photobucket Page Rank
View My Stats